Camera Settings
When I started shooting Roller Derby I was a studio photographer with studio equipment and experience. I almost never shot moving subjects and rarely shot without a tripod. The next couple of years were spent climbing a steep sports learning curve. Five years on and I kinda feel like I know what I’m doing with derby, so I decided to write some of it down in the hope of saving others some time and pain. I’m going to cover camera settings, shooting rules and etiquette, and the shooting locations and angles that I like to use. I’ve already written about colour and the equipment I use.
First up, camera gear and settings.
Basic Terminology
I’m going to assume that you might be unfamiliar with some of the basics, so if you know your way around a DSLR in manual mode you might want to skip ahead a bit.
Exposure: This is basically how bright an image is. If it’s too dark and the shadows are blocked up it’s under exposed (not enough light). If it’s too bright and the highlights are blown, it’s over exposed (too much light).
Exposure is a combination of 3 things, how much light gets through the lens (the aperture), for how long (the shutter speed) and how sensitive the camera is to that light (the ISO). Increase one of those and you have to compensate by decreasing one of the others to keep the same exposure.
Aperture: Also called an F-Stop or a Stop. This is a variable sized hole in the lens that lets the light through at known levels. It’s like the iris in your eye. Look at your eye in a mirror and then shine a light in it. You’ll see the iris close. That’s an aperture.

The full stops include: 2.8, 4, 5.6, 8, 11, 16 and 22, with each bigger number letting through half the light of the previous one. As you stop down the depth of focus increases, but you pay for that with less light. If your camera is working in 3rds of a stop there will be intermediate values between those, but the main stops are the ones we remember. They were etched onto film camera lens barrels. They’ll be on a screen somewhere on a modern camera.
Shutter speed: This is how long the sensor is exposed to light. It’s measured in fractions of a second, each twice as long as the previous, and letting in twice the light, but you pay for that with more blur.
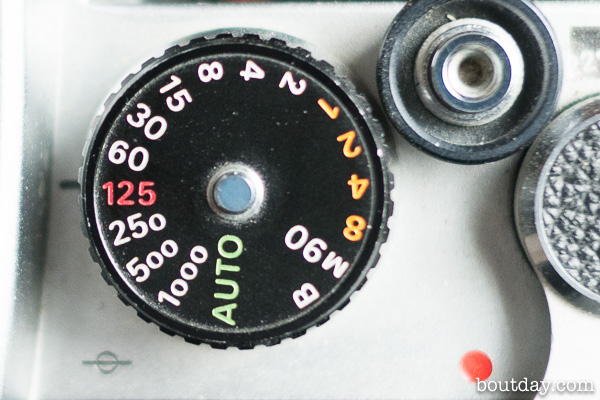
The full speeds include: 1000, 500, 250, 125, 60, 30 and 15. Again, they were etched onto the controls of film cameras.
If you close the aperture down by one stop you’ll need to decrease the shutter speed to keep the same exposure.
More Blur / Deeper Focus
| Aperture | 2.8 | 4 | 5.6 | 8 | 11 | 16 | 22 |
| Shutter Speed | 1000 | 500 | 250 | 125 | 60 | 30 | 15 |
Less Blur / Narrower Focus
ISO: This is the sensitivity of the camera to light. Back in the film days this was know as ASA, but it’s the same scale. 100 ASA was standard print film. 100 ISO is usually the standard setting on a DSLR (on Nikons it’s 200). If you double the number you double the sensitivity and increase the exposure by one stop, but you pay for that with more noise.
So exposure is a triangle that you need to balance. To increase the exposure as things get darker you can open the aperture, lengthen the shutter speed or increase the ISO, but you have to pay for that with less depth of focus, more blur or more noise (a grainy image). Your choice.
Gear
For the most part in photography, equipment doesn’t really matter that much. You can take great images with a most anything. Sport is different. Fast lenses and high end camera bodies really do help. But you can still do a lot with basic gear, particularly now that basic equipment is often as capable as the higher end stuff was 5 years ago. Your result might not be as sharp, but you’ll still get results and learn something in the process.
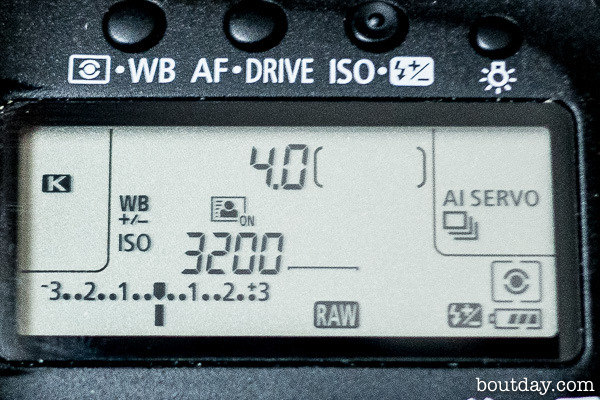
CAMERA: You’ll need a DSLR that’s capable of shooting at 3200 ISO. That’s basically everything that’s been made in the last 5 years or so. Newer cameras will produce lower noise images, but everything should work. Focus tracking will be your biggest issue. The better the camera, the better it’ll be able to focus on a moving subject. You’ll get more keepers with better gear. There’s no getting around that one.
LENSES: The most common lens for derby work is the 70-200 f/2.8. At the high end these are quite expensive, but you can get away with an f/4 if you have brighter venues or a camera that can ramp up to ISO 6400. If you’re having a go for the first time, use what you have. I shot for a year with my 24-105 f/4 and still use that lens for wide shots.
SETTINGS
ISO: Use 3200, unless your venue is usually bright.
Shutter: You want to keep your shutter speed at least at 1/200th to avoid motion blur. You can get away with less if you’re careful, are shooting panning shots or are using a fairly wide angle lens (longer lenses magnify camera shake). But 1/200th is a good rule of thumb minimum to try and stick to.
Aperture: You’ll probably end up using the widest you’ve got. f/2.8 if you’ve got it.
EXPOSURE MODE: If your venue is evenly lit you can use manual exposure. Set ISO 3200 and f/2.8 (or as wide as you have) and see what shutter speed gives you a correctly exposed image. If you end up with a really fast shutter speed you can choose to spend some of that speed to get a smaller aperture of a lower ISO.
If the venue is unevenly lit, you may need to either restrict the direction you shoot in or go with Auto Exposure. When I have to, I use Aperture Priority. Set the ISO to 3200, the aperture to the widest you’ve got and let the camera pick the fastest shutter speed it can. Again if you end up with really fast shutter speeds you can choose to spend some of that speed to get a smaller aperture or a lower ISO.
That might seem to go against the usual advice to use Sutter Priority when shooting sport, but when light is low it’s the only variable you have, so it’s the only thing you can let the camera change.
Focus: This is the most difficult problem. I lose more good derby shots to poor focus than anything else. You can usually fix slight errors in exposure in post processing. You can’t fix poor focus.
Focus mode: You need to use Continuous or Servo Focusing (AI Servo on Canon, AF-C on Nikon) this will make the camera track your subject continuously when focusing is enabled. If you use One Shot (Canon) or AF-S (Nikon) the camera will lock focus once and beep, the skater will continue to move and your shot will be out of focus. Both systems also have hybrid modes (AI Focus or AF-A) that are supposed to start in One Shot mode and move to Continuous Servo if needed. This generally doesn’t work. Avoid.
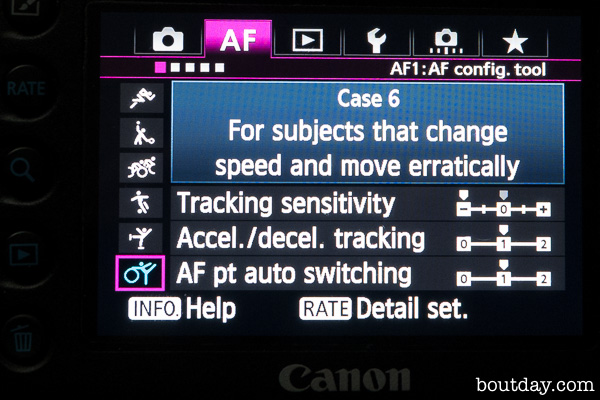
On higher end systems you can tune the focusing system further. The Canon 5D Mk3 has 6 focus algorithms. For derby I’ve settled on Case 6, Subjects that change speed and move erratically, but with the Tracking Sensitivity in Locked On mode. This keeps the camera locked onto by target skater and less likely to get distracted by a ref skating across my line of sight.

You may also have to tweak some other focus parameters specifically for your system or shooting style. I’ve set my Focus Priority to +1 (Focus). This makes the camera prioritise focus accuracy over release time. I’d rather have a sharp shot than a slightly better timed blurry shot.
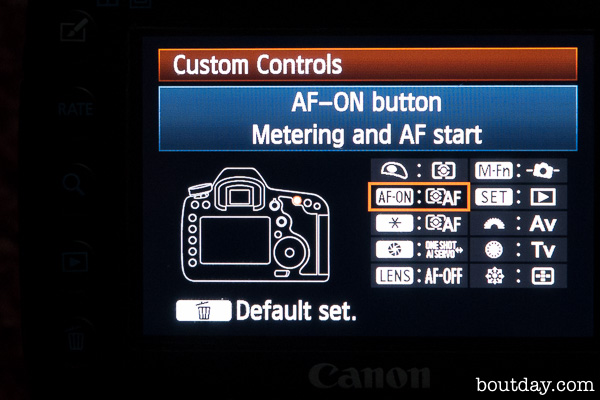
Back button focus: By default your camera will focus when you half press the shutter and stop when you release it. A better option is to set one of the thumb buttons on the back of the camera to enable focusing, and leave the shutter button to just trip the shutter. You can then track focus by pressing that button and you’re less likely to trip the shutter by mistake. It also reduces the strain on your index finger.

Focus points: Your camera probably has multiple focus points and will choose which one to use based on some preprogrammed algorithm. My preference is to select singe point mode and choose the active focus point where I expect the face of the closest skater to be. In horizontal shots that’s usually the top left point – the face of the skater to the outside of the pack, and in vertical shots it’s the top right point, the one that’s usually over the face of the jammer.
Colour: You might get away with Auto White Balance (the usual default) or you could try setting to Incandescent to get rid of any orange cast, but colour is really a separate problem.
DaveMc, Nov 2015